搜索到
51
篇与
Royal
的结果
-
![使用EasySwoole3.3.7搭建基础应用框架实现部分功能]() 使用EasySwoole3.3.7搭建基础应用框架实现部分功能 1. 环境说明运行环境:LINUX,系统版本centos7PHP运行版本:7.4.21Swoole扩展版本:4.5.7Easyswoole版本:3.3.7mongodb版本:4.4.62. 实现功能说明实现入参过滤,入参限制等功能EasySwoole的控制器并没有提供类似中间件的说法,EasySwoole 3.4.x 版本之前:可在项目根目录的EasySwooleEvent.php 中看到onRequestonRequest ,所以在onRequestonRequest事件进行验证。第一步:在APP目录下生成Libraries自定义类文件夹,建立测试拦截类,防止sql注入,对一些关键词进行屏蔽;第二步:在Event中的OnRequest事件进行全局的请求参数过滤或者拦截;签名校验通过RSA加密方式生成一对公私钥,采用私钥加签公钥验签的方式对请求数据进行验签,签名原文生成机制,采用按字段首字母字典升序首尾拼接生成。第一步:创建自定义类RsaClient,包含生成公私钥,签名原文,验签等方法;第二步:一对公私钥配置在项目配置文件/config/rsa中第三步:在Event中的OnRequest事件对请求数据进行验签,验签通过后继续下一步请求;实现Redis和MySql连接池实现MYSQL和REDIS连接池可有效解决减少创建连接的时间,控制资源的使用,达到连接复用的目的。第一步:加载依赖包通过composer安装easyswoole/pool通用连接池组件,easyswoole/redis-pool 协程连接池组件,easyswoole/orm 安装orm组件;第二步:在配置文件dev中添加配置项包含MySQL连接信息,连接池最小和最大连接数,连接池对象最大闲置时间以及REDIS的连接信息,最大最小连接数等;第三步:在EasySwooleEvent.php文件的initialize方法中初始化连接池连接配置信息,日志记录异常;实现日志处理自定义类用ioc重写系统日志类,实现LoggerInterface接口。第一步:在自定义类中增加Log文件实现系统日志类接口;第二步:项目根目录创建文件 bootstrap.php,IOC覆盖系统日志类,注册自定义日志处理器;use App\Log\LogHandler; use EasySwoole\Component\Di; use EasySwoole\EasySwoole\SysConst; //IOC覆盖系统日志类 Di::getInstance()->set(SysConst::LOGGER_HANDLER, LogHandler::class); 实现elasticsearch协程客户端通过composer 安装easyswoole/elasticsearch组件实现mongodb客户端通过composer安装easyswoole/sync-invoker组件和mongodb/mongodb组件,定义驱动,客户端调用类定义,在 EasySwoole 全局事件 的 mainServerCreate 事件中进行服务注册。实现IP限流和IP白名单机制使用 Swoole\Table,存储用户访问情况,使用定时器,将前一周期的访问情况清空,统计下一周期。第一步:IP 访问统计类,实现了 初始化 Table、统计 IP访问次数、获取一个周期内次数超过一定值的记录;class IpList { use Singleton; /** @var Table */ protected $table; public function __construct() { TableManager::getInstance()->add('ipList', [ 'ip' => [ 'type' => Table::TYPE_STRING, 'size' => 16 ], 'count' => [ 'type' => Table::TYPE_INT, 'size' => 8 ], 'lastAccessTime' => [ 'type' => Table::TYPE_INT, 'size' => 8 ] ], 1024 * 128); $this->table = TableManager::getInstance()->get('ipList'); } public function access(string $ip): int { $key = substr(md5($ip), 8, 16); $info = $this->table->get($key); if ($info) { $this->table->set($key, [ 'lastAccessTime' => time(), 'count' => $info['count'] + 1, ]); return $info['count'] + 1; } else { $this->table->set($key, [ 'ip' => $ip, 'lastAccessTime' => time(), 'count' => 1, ]); return 1; } } public function clear() { foreach ($this->table as $key => $item) { $this->table->del($key); } } public function accessList($count = 10): array { $ret = []; foreach ($this->table as $key => $item) { if ($item['count'] >= $count) { $ret[] = $item; } } return $ret; } }第二步:封装完IP统计 的操作之后,我们就可以在 EasySwooleEvent.php 中的 mainServerCreate 回调事件中初始化 IpList 类和定时器,注册 IP 统计自定义进程第三步:在 EasySwooleEvent.php 中的 onRequestonRequest 事件中 接着我们在判断和统计IP的访问 3. 项目地址 https://gitee.com/sangshuaidong2020/easyswoole
使用EasySwoole3.3.7搭建基础应用框架实现部分功能 1. 环境说明运行环境:LINUX,系统版本centos7PHP运行版本:7.4.21Swoole扩展版本:4.5.7Easyswoole版本:3.3.7mongodb版本:4.4.62. 实现功能说明实现入参过滤,入参限制等功能EasySwoole的控制器并没有提供类似中间件的说法,EasySwoole 3.4.x 版本之前:可在项目根目录的EasySwooleEvent.php 中看到onRequestonRequest ,所以在onRequestonRequest事件进行验证。第一步:在APP目录下生成Libraries自定义类文件夹,建立测试拦截类,防止sql注入,对一些关键词进行屏蔽;第二步:在Event中的OnRequest事件进行全局的请求参数过滤或者拦截;签名校验通过RSA加密方式生成一对公私钥,采用私钥加签公钥验签的方式对请求数据进行验签,签名原文生成机制,采用按字段首字母字典升序首尾拼接生成。第一步:创建自定义类RsaClient,包含生成公私钥,签名原文,验签等方法;第二步:一对公私钥配置在项目配置文件/config/rsa中第三步:在Event中的OnRequest事件对请求数据进行验签,验签通过后继续下一步请求;实现Redis和MySql连接池实现MYSQL和REDIS连接池可有效解决减少创建连接的时间,控制资源的使用,达到连接复用的目的。第一步:加载依赖包通过composer安装easyswoole/pool通用连接池组件,easyswoole/redis-pool 协程连接池组件,easyswoole/orm 安装orm组件;第二步:在配置文件dev中添加配置项包含MySQL连接信息,连接池最小和最大连接数,连接池对象最大闲置时间以及REDIS的连接信息,最大最小连接数等;第三步:在EasySwooleEvent.php文件的initialize方法中初始化连接池连接配置信息,日志记录异常;实现日志处理自定义类用ioc重写系统日志类,实现LoggerInterface接口。第一步:在自定义类中增加Log文件实现系统日志类接口;第二步:项目根目录创建文件 bootstrap.php,IOC覆盖系统日志类,注册自定义日志处理器;use App\Log\LogHandler; use EasySwoole\Component\Di; use EasySwoole\EasySwoole\SysConst; //IOC覆盖系统日志类 Di::getInstance()->set(SysConst::LOGGER_HANDLER, LogHandler::class); 实现elasticsearch协程客户端通过composer 安装easyswoole/elasticsearch组件实现mongodb客户端通过composer安装easyswoole/sync-invoker组件和mongodb/mongodb组件,定义驱动,客户端调用类定义,在 EasySwoole 全局事件 的 mainServerCreate 事件中进行服务注册。实现IP限流和IP白名单机制使用 Swoole\Table,存储用户访问情况,使用定时器,将前一周期的访问情况清空,统计下一周期。第一步:IP 访问统计类,实现了 初始化 Table、统计 IP访问次数、获取一个周期内次数超过一定值的记录;class IpList { use Singleton; /** @var Table */ protected $table; public function __construct() { TableManager::getInstance()->add('ipList', [ 'ip' => [ 'type' => Table::TYPE_STRING, 'size' => 16 ], 'count' => [ 'type' => Table::TYPE_INT, 'size' => 8 ], 'lastAccessTime' => [ 'type' => Table::TYPE_INT, 'size' => 8 ] ], 1024 * 128); $this->table = TableManager::getInstance()->get('ipList'); } public function access(string $ip): int { $key = substr(md5($ip), 8, 16); $info = $this->table->get($key); if ($info) { $this->table->set($key, [ 'lastAccessTime' => time(), 'count' => $info['count'] + 1, ]); return $info['count'] + 1; } else { $this->table->set($key, [ 'ip' => $ip, 'lastAccessTime' => time(), 'count' => 1, ]); return 1; } } public function clear() { foreach ($this->table as $key => $item) { $this->table->del($key); } } public function accessList($count = 10): array { $ret = []; foreach ($this->table as $key => $item) { if ($item['count'] >= $count) { $ret[] = $item; } } return $ret; } }第二步:封装完IP统计 的操作之后,我们就可以在 EasySwooleEvent.php 中的 mainServerCreate 回调事件中初始化 IpList 类和定时器,注册 IP 统计自定义进程第三步:在 EasySwooleEvent.php 中的 onRequestonRequest 事件中 接着我们在判断和统计IP的访问 3. 项目地址 https://gitee.com/sangshuaidong2020/easyswoole -
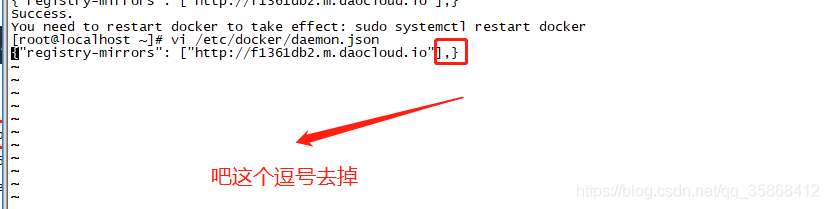
![使用docker lnmp镜像包部署搭建laravel项目]() 使用docker lnmp镜像包部署搭建laravel项目 #更新yum软件管理器 yum -y update#安装docker yum install -y docker#配置docker加速器 curl -sSL https://get.daocloud.io/daotools/set_mirror.sh | sh -s http://f1361db2.m.daocloud.io修改docker的配置文件vi /etc/docker/daemon.json配置一下CDN在/etc/resolv.conf文件中新增一个参数然后重启docker service docker restart查看docker版本确认是否安装成功docker version搜索LNMP镜像docker search LNMP 选取stars最多的镜像作为环境拉取镜像docker pull 2233466866/lnmp问题1 :拉取镜像时会报以下错误Get https://registry-1.docker.io/v2/: read tcp 192.168.174.128:49316->3.229.227.53:443: read: connection reset by peer 解决 :Docker Error response from daemon: Get https://registry-1.docker.io/v2/: read tcp的问题首先:通过dig @114.114.114.114 registry-1.docker.io找到可用IP配置找到的可用ip:修改hosts文件vi /etc/hosts添加进刚才找的可用ip:52.87.94.70 registry-1.docker.io保存退出即可 问题2 :拉取镜像太慢 解决 :登录阿里云后,访问https://cr.console.aliyun.com/cn-hangzhou/instances/mirrors,会看到加速器地址,复制下来,执行后面的命令。#编辑 /etc/docker/daemon.json 配置文件 将复制出来的阿里云加速器地址添加到json数组中 { "registry-mirrors": [ "https://hub-mirror.c.163.com", "https://mirror.baidubce.com" ] } #重启 Docker 服务 systemctl daemon-reload systemctl restart docker #检查是否生效 docker info 结果中显示了我们设置的镜像服务器地址,则说明设置已经生效查看镜像是否拉取成功docker images可以看到拉取成功!启动容器docker run -it --privileged --name=lnmp -p 20016:80 -p 3306:3306 -v ~/www:/www -v ~/lnmp-data/env/mysqlData:/data/mysql -v ~/lnmp-data/env/nginx.conf:/usr/local/nginx/conf/nginx.conf 2233466866/lnmp问题1 :启动容器时会报以下错误:/usr/bin/docker-current: Error response from daemon: oci runtime error: container_linux.go:235: starting container process caused "container init exited prematurely原因 : linux 与 docker 版本的兼容性问题,可以尝试重新安装 docker 或者升级linux内核解决 :第一种:yum update解决 :第二种:升级docker版本1.卸载旧版本 docker yum remove docker docker-common docker-selinux dockesr-engine -y 2.升级系统软件 yum upgrade -y 3.安装必要的一些系统工具 sudo yum install -y yum-utils device-mapper-persistent-data lvm2 4.添加软件源信息 yum-config-manager --add-repo https://mirrors.aliyun.com/docker-ce/linux/centos/docker-ce.repo 5.更新并安装 docker-ce yum makecache fast yum install docker-ce -y 6.启动服务 systemctl daemon-reload systemctl restart docker说明:~/www 是工作目录~/lnmp-data/env/mysqlData 是数据库目录~/lnmp-data/env/nginx.conf 是nginx是配置文件20016是本地端口我的一个项目 目录是~/www/wwwroot/laravel,所以nginx.conf配置文件的内容如下:user www; worker_processes auto; worker_cpu_affinity auto; pid logs/nginx.pid; events { worker_connections 102400; } http { charset utf-8; server_tokens off; log_format main '$remote_addr - $remote_user [$time_local] "$request" ' '$status $body_bytes_sent "$http_referer" ' '"$http_user_agent" "$http_x_forwarded_for"'; include mime.types; default_type application/octet-stream; client_max_body_size 20M; sendfile on; keepalive_timeout 20; gzip on; gzip_vary on; gzip_comp_level 1; gzip_types text/css application/javascript application/json image/png image/webp image/apng image/jpeg image/x-icon; error_log /www/z_error.log; access_log /www/z_$host.log main; server { listen 80; server_name www.test.com; root /www/wwwroot/laravel/public; index index.html index.htm index.php autoindex on; location / { index index.php index.html index.htm; try_files $uri $uri/ /index.php?$query_string; } location ~* \.php { include fastcgi_params; fastcgi_index index.php; fastcgi_pass 127.0.0.1:9000; fastcgi_split_path_info ^(.+\.php)(.*)$; fastcgi_param PATH_INFO $fastcgi_path_info; fastcgi_param SCRIPT_NAME $fastcgi_script_name; fastcgi_param SCRIPT_FILENAME $document_root$fastcgi_script_name; } } }其他命令docker ps -a 查看所有容器 docker stop ****** 停止运行容器 docker rm ***** 删除容器(删除前需停掉)
使用docker lnmp镜像包部署搭建laravel项目 #更新yum软件管理器 yum -y update#安装docker yum install -y docker#配置docker加速器 curl -sSL https://get.daocloud.io/daotools/set_mirror.sh | sh -s http://f1361db2.m.daocloud.io修改docker的配置文件vi /etc/docker/daemon.json配置一下CDN在/etc/resolv.conf文件中新增一个参数然后重启docker service docker restart查看docker版本确认是否安装成功docker version搜索LNMP镜像docker search LNMP 选取stars最多的镜像作为环境拉取镜像docker pull 2233466866/lnmp问题1 :拉取镜像时会报以下错误Get https://registry-1.docker.io/v2/: read tcp 192.168.174.128:49316->3.229.227.53:443: read: connection reset by peer 解决 :Docker Error response from daemon: Get https://registry-1.docker.io/v2/: read tcp的问题首先:通过dig @114.114.114.114 registry-1.docker.io找到可用IP配置找到的可用ip:修改hosts文件vi /etc/hosts添加进刚才找的可用ip:52.87.94.70 registry-1.docker.io保存退出即可 问题2 :拉取镜像太慢 解决 :登录阿里云后,访问https://cr.console.aliyun.com/cn-hangzhou/instances/mirrors,会看到加速器地址,复制下来,执行后面的命令。#编辑 /etc/docker/daemon.json 配置文件 将复制出来的阿里云加速器地址添加到json数组中 { "registry-mirrors": [ "https://hub-mirror.c.163.com", "https://mirror.baidubce.com" ] } #重启 Docker 服务 systemctl daemon-reload systemctl restart docker #检查是否生效 docker info 结果中显示了我们设置的镜像服务器地址,则说明设置已经生效查看镜像是否拉取成功docker images可以看到拉取成功!启动容器docker run -it --privileged --name=lnmp -p 20016:80 -p 3306:3306 -v ~/www:/www -v ~/lnmp-data/env/mysqlData:/data/mysql -v ~/lnmp-data/env/nginx.conf:/usr/local/nginx/conf/nginx.conf 2233466866/lnmp问题1 :启动容器时会报以下错误:/usr/bin/docker-current: Error response from daemon: oci runtime error: container_linux.go:235: starting container process caused "container init exited prematurely原因 : linux 与 docker 版本的兼容性问题,可以尝试重新安装 docker 或者升级linux内核解决 :第一种:yum update解决 :第二种:升级docker版本1.卸载旧版本 docker yum remove docker docker-common docker-selinux dockesr-engine -y 2.升级系统软件 yum upgrade -y 3.安装必要的一些系统工具 sudo yum install -y yum-utils device-mapper-persistent-data lvm2 4.添加软件源信息 yum-config-manager --add-repo https://mirrors.aliyun.com/docker-ce/linux/centos/docker-ce.repo 5.更新并安装 docker-ce yum makecache fast yum install docker-ce -y 6.启动服务 systemctl daemon-reload systemctl restart docker说明:~/www 是工作目录~/lnmp-data/env/mysqlData 是数据库目录~/lnmp-data/env/nginx.conf 是nginx是配置文件20016是本地端口我的一个项目 目录是~/www/wwwroot/laravel,所以nginx.conf配置文件的内容如下:user www; worker_processes auto; worker_cpu_affinity auto; pid logs/nginx.pid; events { worker_connections 102400; } http { charset utf-8; server_tokens off; log_format main '$remote_addr - $remote_user [$time_local] "$request" ' '$status $body_bytes_sent "$http_referer" ' '"$http_user_agent" "$http_x_forwarded_for"'; include mime.types; default_type application/octet-stream; client_max_body_size 20M; sendfile on; keepalive_timeout 20; gzip on; gzip_vary on; gzip_comp_level 1; gzip_types text/css application/javascript application/json image/png image/webp image/apng image/jpeg image/x-icon; error_log /www/z_error.log; access_log /www/z_$host.log main; server { listen 80; server_name www.test.com; root /www/wwwroot/laravel/public; index index.html index.htm index.php autoindex on; location / { index index.php index.html index.htm; try_files $uri $uri/ /index.php?$query_string; } location ~* \.php { include fastcgi_params; fastcgi_index index.php; fastcgi_pass 127.0.0.1:9000; fastcgi_split_path_info ^(.+\.php)(.*)$; fastcgi_param PATH_INFO $fastcgi_path_info; fastcgi_param SCRIPT_NAME $fastcgi_script_name; fastcgi_param SCRIPT_FILENAME $document_root$fastcgi_script_name; } } }其他命令docker ps -a 查看所有容器 docker stop ****** 停止运行容器 docker rm ***** 删除容器(删除前需停掉) -
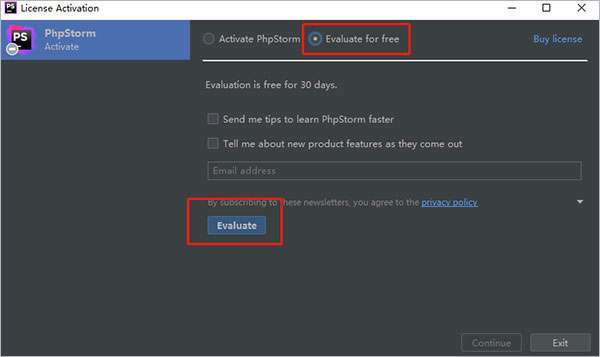
![jetbrains全家桶永久激活补丁+激活方法]()
-
![git环境权限被拒绝(publickey)不匹配的解决办法]() git环境权限被拒绝(publickey)不匹配的解决办法 在线上环境执行远程仓代码拉取时突然报以下错误:此问题说明两种情况:1.大概率是秘钥设置不对的问题2.线上环境没生成SSH key怎么解决此问题?第一步:首先查看是否存在SSH key执行命令ls -al ~/.ssh上图说明没有生成SSH key自然也不会匹配成功,怎么生成SSH key第二步:生成SSH key在终端输入 ssh-keygen -t rsa -C "git邮箱账号"上图说明已经更新完成了SSH key第三步:配对git代码仓复制公钥(如果问题是不匹配可以忽略前两步)执行命令cat ~/.ssh/id_rsa.pub 打印出SSH key的公钥(注意是公钥)第四步:设置git把上一步复制出来的公钥添加到git设置中点击保存即可重新git pull 尝试更新代码问题已解决,输入git密码即可同步更新代码。
git环境权限被拒绝(publickey)不匹配的解决办法 在线上环境执行远程仓代码拉取时突然报以下错误:此问题说明两种情况:1.大概率是秘钥设置不对的问题2.线上环境没生成SSH key怎么解决此问题?第一步:首先查看是否存在SSH key执行命令ls -al ~/.ssh上图说明没有生成SSH key自然也不会匹配成功,怎么生成SSH key第二步:生成SSH key在终端输入 ssh-keygen -t rsa -C "git邮箱账号"上图说明已经更新完成了SSH key第三步:配对git代码仓复制公钥(如果问题是不匹配可以忽略前两步)执行命令cat ~/.ssh/id_rsa.pub 打印出SSH key的公钥(注意是公钥)第四步:设置git把上一步复制出来的公钥添加到git设置中点击保存即可重新git pull 尝试更新代码问题已解决,输入git密码即可同步更新代码。 -
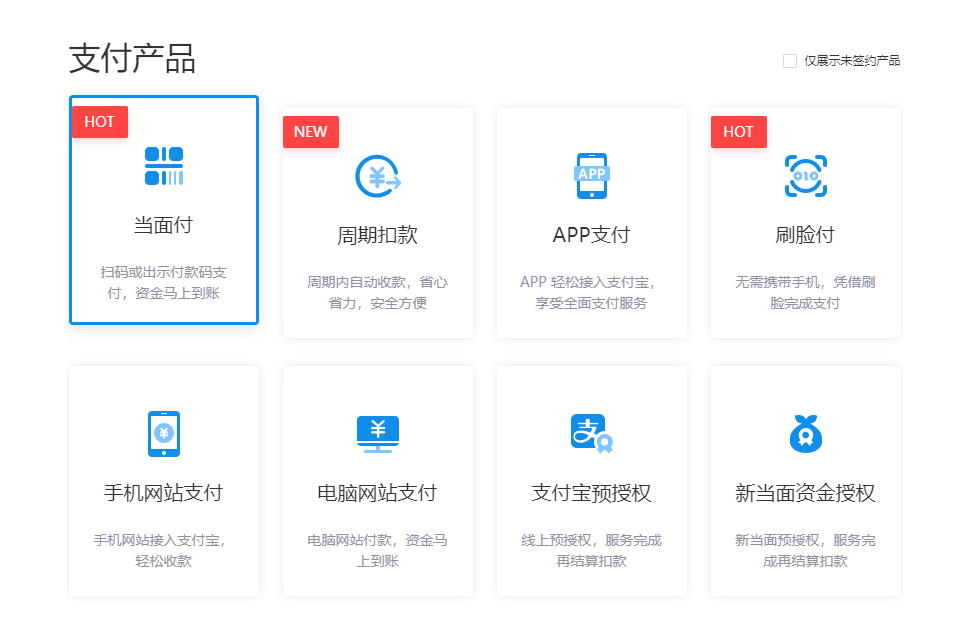
![支付宝支付配置开发流程]() 支付宝支付配置开发流程 进入支付宝商家中心 https://b.alipay.com/index2.htm点击产品中心 找到网站支付,进行申请接入支付,如果已经开通请跳过进入支付宝商家开发者中心 https://openhome.alipay.com/platform/developerIndex.htm点击创建应用输入应用名称上传应用图标创建好应用后进去配置阶段,点击下图中的设置,进入接口加密设置,这里需要验证短信验证完短信进入加签管理界面下载 [支付宝密钥生成器]进行安装 https://opendocs.alipay.com/open/291/105971打开[支付宝开放平台开发助手],勾选以下选项,点击生成生成好的密钥如下图,注意不要关闭当前页面复制应用公钥填写在 7 图中的 [填写公钥字符]这一栏,点击保存设置配置接口访问白名单,验证短信完后如下图 , 勾选 配置全量接口填写自己服务器的ip地址进去保存在支付宝开发者中当前得应用中查看支付宝公钥并复制APPID绑定如何查看APPID提交审核应用功能添加19.目前拿到了三个参数:分别是1.应用appid,2.蚂蚁金服key 图11中的应用私钥,3.蚂蚁金服公钥 图14中得到支付宝公钥20.下载sdk配置三个参数 即可完成支付宝调用。21.支付下单代码如下/** * alipay.trade.wap.pay * @param $builder 业务参数,使用buildmodel中的对象生成。 * @param $return_url 同步跳转地址,公网可访问 * @param $notify_url 异步通知地址,公网可以访问 * @return $response 支付宝返回的信息 */ function wapPay($builder,$return_url,$notify_url) { $biz_content=$builder->getBizContent(); //打印业务参数 $this->writeLog($biz_content); $request = new AlipayTradeWapPayRequest(); $request->setNotifyUrl($notify_url); $request->setReturnUrl($return_url); $request->setBizContent ( $biz_content ); // 首先调用支付api $response = $this->aopclientRequestExecute ($request,true); // $response = $response->alipay_trade_wap_pay_response; return $response; } function aopclientRequestExecute($request,$ispage=false) { $aop = new AopClient (); $aop->gatewayUrl = $this->gateway_url; $aop->appId = $this->appid; $aop->rsaPrivateKey = $this->private_key; $aop->alipayrsaPublicKey = $this->alipay_public_key; $aop->apiVersion ="1.0"; $aop->postCharset = $this->charset; $aop->format= $this->format; $aop->signType=$this->signtype; // 开启页面信息输出 $aop->debugInfo=true; if($ispage) { $result = $aop->pageExecute($request,"post"); echo $result; } else { $result = $aop->Execute($request); } //打开后,将报文写入log文件 $this->writeLog("response: ".var_export($result,true)); return $result; } /* 页面提交执行方法 @param:跳转类接口的request; $httpmethod 提交方式。两个值可选:post、get @return:构建好的、签名后的最终跳转URL(GET)或String形式的form(POST) auther:笙默 */ public function pageExecute($request,$httpmethod = "POST") { $this->setupCharsets($request); if (strcasecmp($this->fileCharset, $this->postCharset)) { // writeLog("本地文件字符集编码与表单提交编码不一致,请务必设置成一样,属性名分别为postCharset!"); throw new Exception("文件编码:[" . $this->fileCharset . "] 与表单提交编码:[" . $this->postCharset . "]两者不一致!"); } $iv=null; if(!$this->checkEmpty($request->getApiVersion())){ $iv=$request->getApiVersion(); }else{ $iv=$this->apiVersion; } //组装系统参数 $sysParams["app_id"] = $this->appId; $sysParams["version"] = $iv; $sysParams["format"] = $this->format; $sysParams["sign_type"] = $this->signType; $sysParams["method"] = $request->getApiMethodName(); $sysParams["timestamp"] = date("Y-m-d H:i:s"); $sysParams["alipay_sdk"] = $this->alipaySdkVersion; $sysParams["terminal_type"] = $request->getTerminalType(); $sysParams["terminal_info"] = $request->getTerminalInfo(); $sysParams["prod_code"] = $request->getProdCode(); $sysParams["notify_url"] = $request->getNotifyUrl(); $sysParams["return_url"] = $request->getReturnUrl(); $sysParams["charset"] = $this->postCharset; //获取业务参数 $apiParams = $request->getApiParas(); if (method_exists($request,"getNeedEncrypt") &&$request->getNeedEncrypt()){ $sysParams["encrypt_type"] = $this->encryptType; if ($this->checkEmpty($apiParams['biz_content'])) { throw new Exception(" api request Fail! The reason : encrypt request is not supperted!"); } if ($this->checkEmpty($this->encryptKey) || $this->checkEmpty($this->encryptType)) { throw new Exception(" encryptType and encryptKey must not null! "); } if ("AES" != $this->encryptType) { throw new Exception("加密类型只支持AES"); } // 执行加密 $enCryptContent = encrypt($apiParams['biz_content'], $this->encryptKey); $apiParams['biz_content'] = $enCryptContent; } //print_r($apiParams); $totalParams = array_merge($apiParams, $sysParams); //待签名字符串 $preSignStr = $this->getSignContent($totalParams); //签名 $totalParams["sign"] = $this->generateSign($totalParams, $this->signType); if ("GET" == strtoupper($httpmethod)) { //value做urlencode $preString=$this->getSignContentUrlencode($totalParams); //拼接GET请求串 $requestUrl = $this->gatewayUrl."?".$preString; return $requestUrl; } else { //拼接表单字符串 return $this->buildRequestForm($totalParams); } }
支付宝支付配置开发流程 进入支付宝商家中心 https://b.alipay.com/index2.htm点击产品中心 找到网站支付,进行申请接入支付,如果已经开通请跳过进入支付宝商家开发者中心 https://openhome.alipay.com/platform/developerIndex.htm点击创建应用输入应用名称上传应用图标创建好应用后进去配置阶段,点击下图中的设置,进入接口加密设置,这里需要验证短信验证完短信进入加签管理界面下载 [支付宝密钥生成器]进行安装 https://opendocs.alipay.com/open/291/105971打开[支付宝开放平台开发助手],勾选以下选项,点击生成生成好的密钥如下图,注意不要关闭当前页面复制应用公钥填写在 7 图中的 [填写公钥字符]这一栏,点击保存设置配置接口访问白名单,验证短信完后如下图 , 勾选 配置全量接口填写自己服务器的ip地址进去保存在支付宝开发者中当前得应用中查看支付宝公钥并复制APPID绑定如何查看APPID提交审核应用功能添加19.目前拿到了三个参数:分别是1.应用appid,2.蚂蚁金服key 图11中的应用私钥,3.蚂蚁金服公钥 图14中得到支付宝公钥20.下载sdk配置三个参数 即可完成支付宝调用。21.支付下单代码如下/** * alipay.trade.wap.pay * @param $builder 业务参数,使用buildmodel中的对象生成。 * @param $return_url 同步跳转地址,公网可访问 * @param $notify_url 异步通知地址,公网可以访问 * @return $response 支付宝返回的信息 */ function wapPay($builder,$return_url,$notify_url) { $biz_content=$builder->getBizContent(); //打印业务参数 $this->writeLog($biz_content); $request = new AlipayTradeWapPayRequest(); $request->setNotifyUrl($notify_url); $request->setReturnUrl($return_url); $request->setBizContent ( $biz_content ); // 首先调用支付api $response = $this->aopclientRequestExecute ($request,true); // $response = $response->alipay_trade_wap_pay_response; return $response; } function aopclientRequestExecute($request,$ispage=false) { $aop = new AopClient (); $aop->gatewayUrl = $this->gateway_url; $aop->appId = $this->appid; $aop->rsaPrivateKey = $this->private_key; $aop->alipayrsaPublicKey = $this->alipay_public_key; $aop->apiVersion ="1.0"; $aop->postCharset = $this->charset; $aop->format= $this->format; $aop->signType=$this->signtype; // 开启页面信息输出 $aop->debugInfo=true; if($ispage) { $result = $aop->pageExecute($request,"post"); echo $result; } else { $result = $aop->Execute($request); } //打开后,将报文写入log文件 $this->writeLog("response: ".var_export($result,true)); return $result; } /* 页面提交执行方法 @param:跳转类接口的request; $httpmethod 提交方式。两个值可选:post、get @return:构建好的、签名后的最终跳转URL(GET)或String形式的form(POST) auther:笙默 */ public function pageExecute($request,$httpmethod = "POST") { $this->setupCharsets($request); if (strcasecmp($this->fileCharset, $this->postCharset)) { // writeLog("本地文件字符集编码与表单提交编码不一致,请务必设置成一样,属性名分别为postCharset!"); throw new Exception("文件编码:[" . $this->fileCharset . "] 与表单提交编码:[" . $this->postCharset . "]两者不一致!"); } $iv=null; if(!$this->checkEmpty($request->getApiVersion())){ $iv=$request->getApiVersion(); }else{ $iv=$this->apiVersion; } //组装系统参数 $sysParams["app_id"] = $this->appId; $sysParams["version"] = $iv; $sysParams["format"] = $this->format; $sysParams["sign_type"] = $this->signType; $sysParams["method"] = $request->getApiMethodName(); $sysParams["timestamp"] = date("Y-m-d H:i:s"); $sysParams["alipay_sdk"] = $this->alipaySdkVersion; $sysParams["terminal_type"] = $request->getTerminalType(); $sysParams["terminal_info"] = $request->getTerminalInfo(); $sysParams["prod_code"] = $request->getProdCode(); $sysParams["notify_url"] = $request->getNotifyUrl(); $sysParams["return_url"] = $request->getReturnUrl(); $sysParams["charset"] = $this->postCharset; //获取业务参数 $apiParams = $request->getApiParas(); if (method_exists($request,"getNeedEncrypt") &&$request->getNeedEncrypt()){ $sysParams["encrypt_type"] = $this->encryptType; if ($this->checkEmpty($apiParams['biz_content'])) { throw new Exception(" api request Fail! The reason : encrypt request is not supperted!"); } if ($this->checkEmpty($this->encryptKey) || $this->checkEmpty($this->encryptType)) { throw new Exception(" encryptType and encryptKey must not null! "); } if ("AES" != $this->encryptType) { throw new Exception("加密类型只支持AES"); } // 执行加密 $enCryptContent = encrypt($apiParams['biz_content'], $this->encryptKey); $apiParams['biz_content'] = $enCryptContent; } //print_r($apiParams); $totalParams = array_merge($apiParams, $sysParams); //待签名字符串 $preSignStr = $this->getSignContent($totalParams); //签名 $totalParams["sign"] = $this->generateSign($totalParams, $this->signType); if ("GET" == strtoupper($httpmethod)) { //value做urlencode $preString=$this->getSignContentUrlencode($totalParams); //拼接GET请求串 $requestUrl = $this->gatewayUrl."?".$preString; return $requestUrl; } else { //拼接表单字符串 return $this->buildRequestForm($totalParams); } }